123 Street Avenue, City Town, 99999

(123) 555-6789

email@address.com


You can set your address, phone number, email and site description in the settings tab.
Link to read me page with more information.

Home

Filtering by Tag: DIY

DIY Moss Bowl Centrepiece

Linnea A.

IMG_6314.JPG
IMG_6319.JPG

If you’re not familiar with the infamous Restoration Hardware moss bowl centrepieces and pots… well, I’m sorry, but you’ve likely been living under a rock!! These centrepieces can be found in almost every room you walk through in a Restoration Hardware store, but they all come with a hefty price tag to buy their vessels (even if you just buy their preserved moss to make it yourself).

IMG_6316.JPG
IMG_6315.JPG

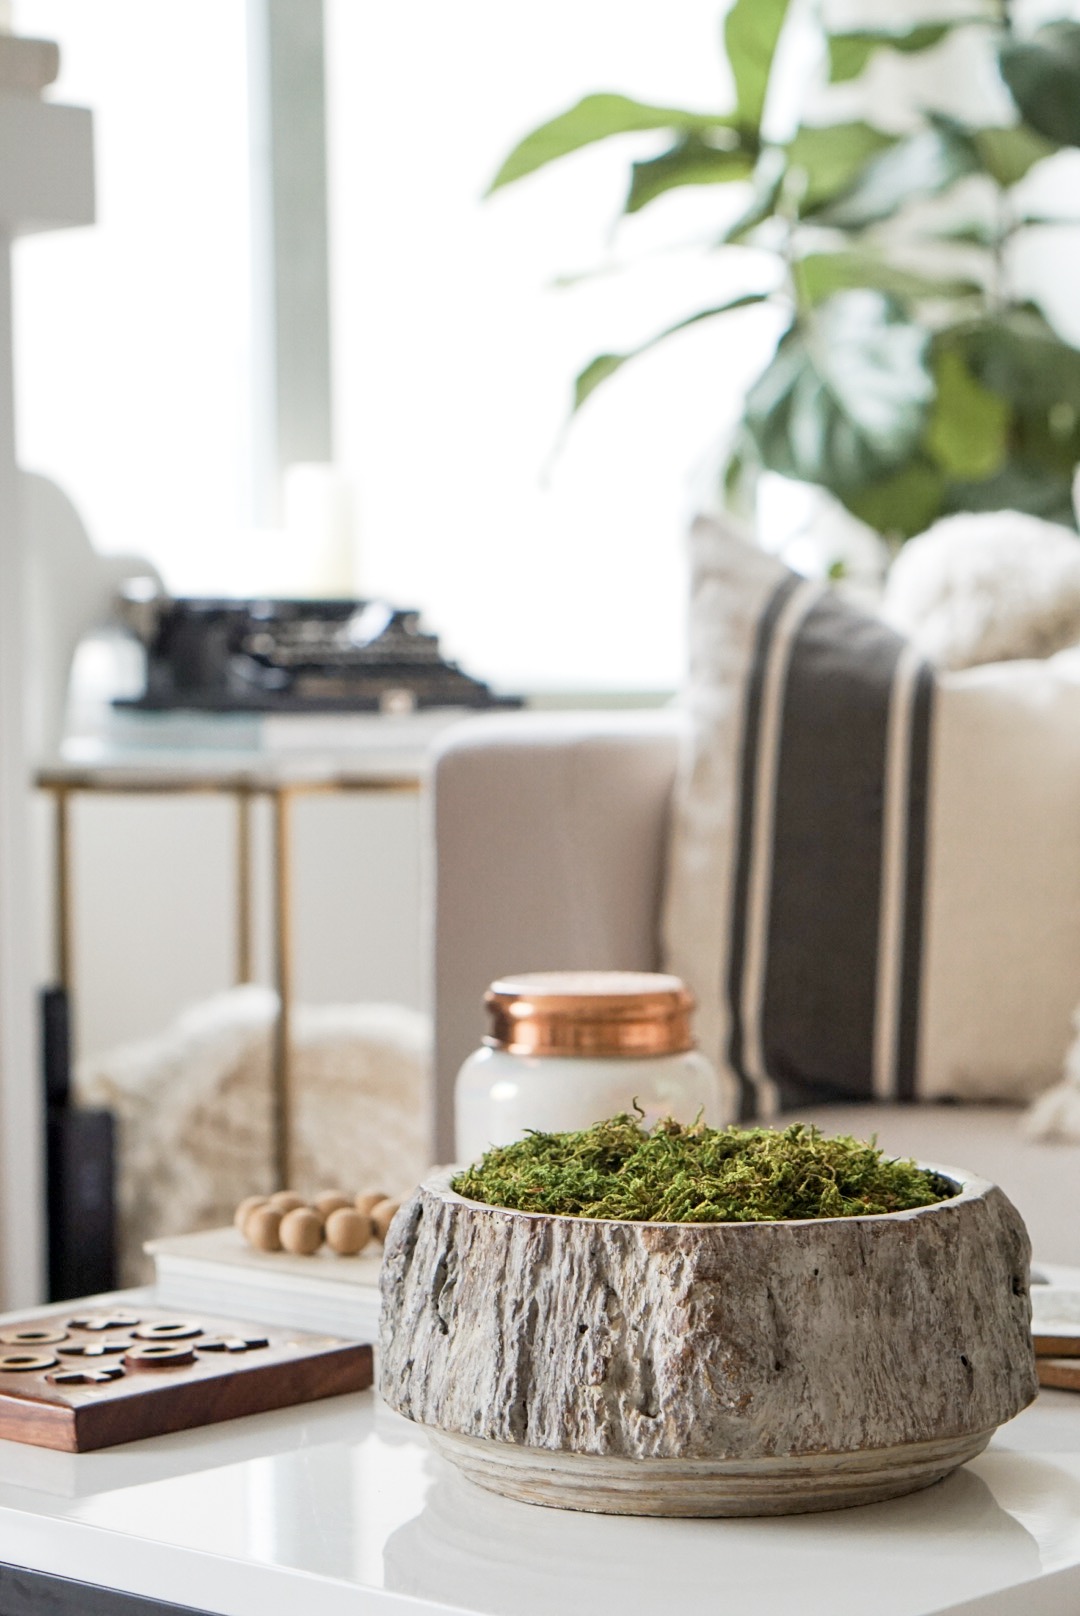
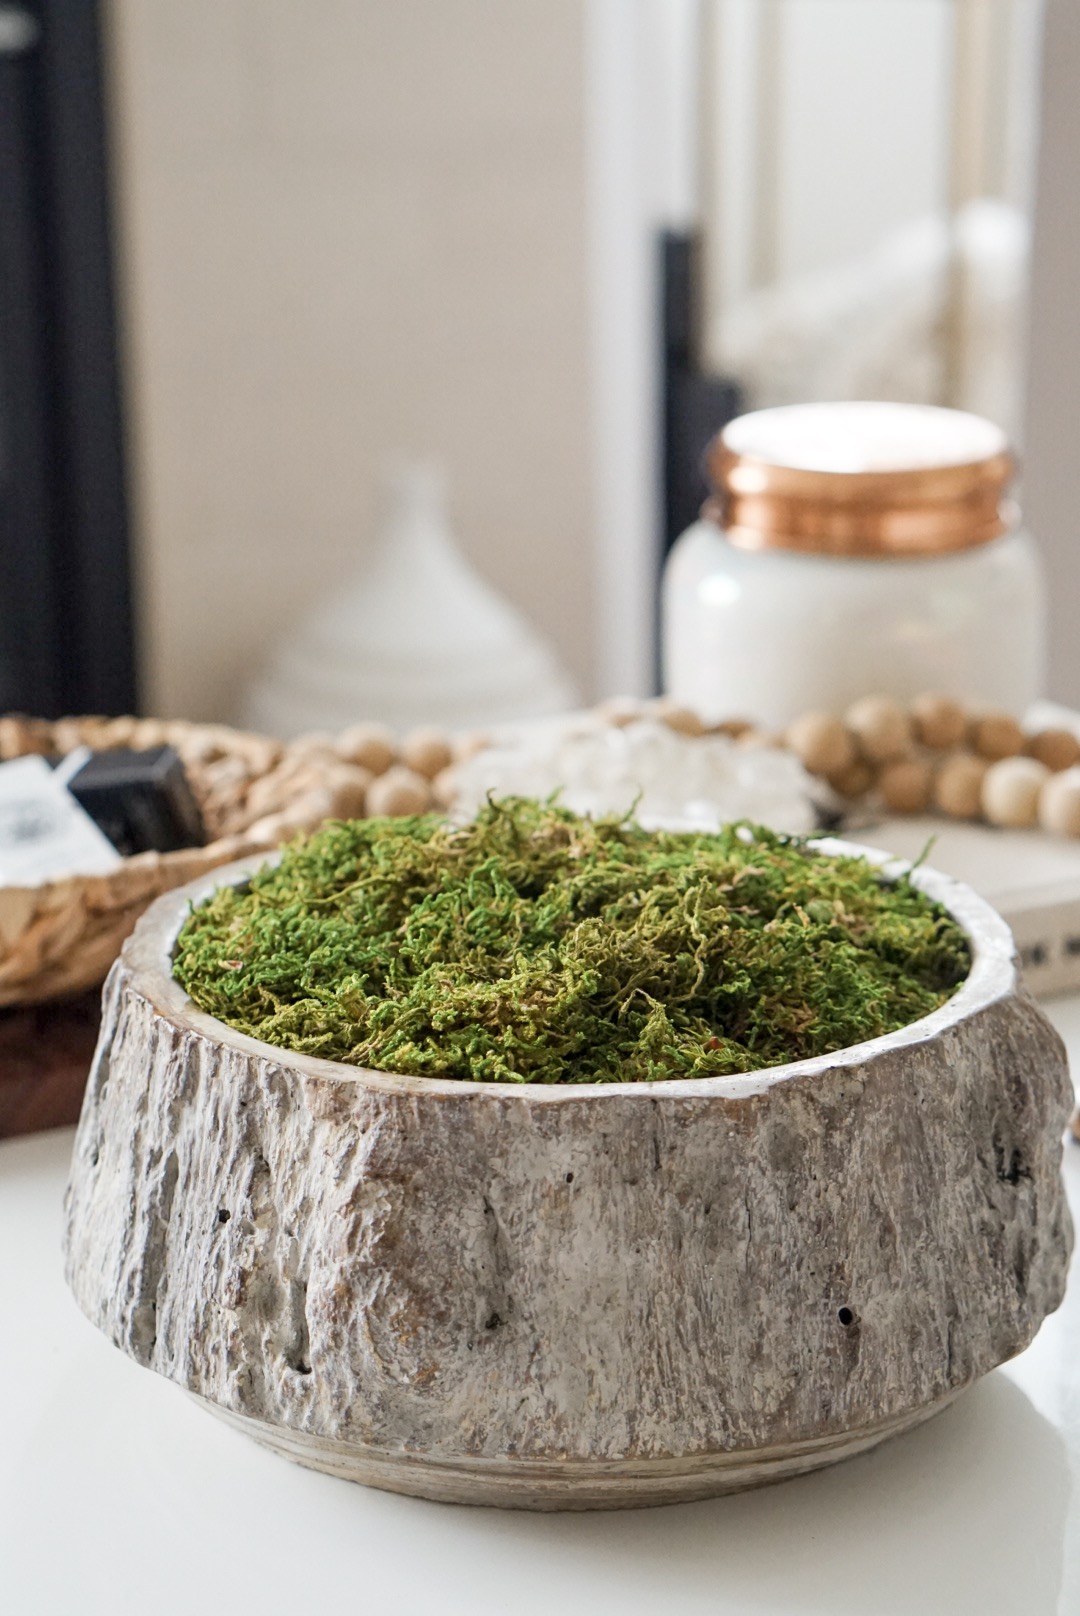
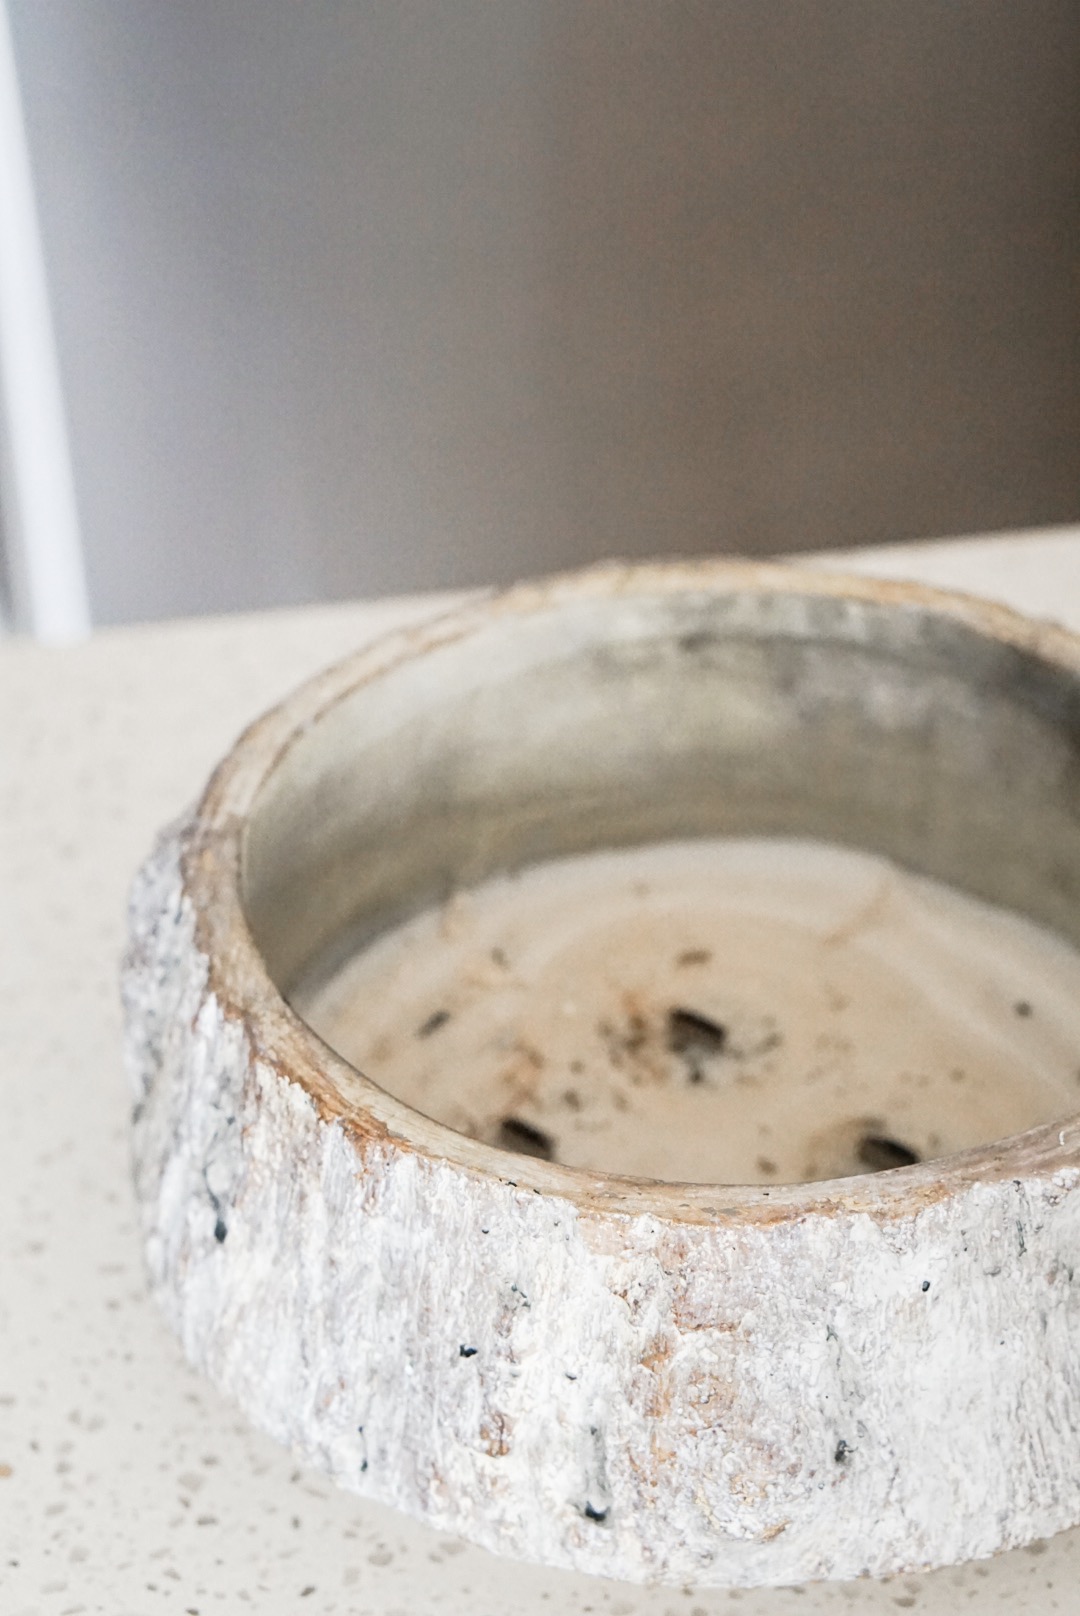
Well good news people!! You can easily make these centrepieces yourself - maybe even with things you have around the house! I happened to have a burnt out cement “wood-grain” candle holder, so I decided it was the perfect vessel to make my first moss centrepiece. The key to making these centrepieces as cost-effective as possible is to use just a little bit of moss, and fill the bottom with something else (because it won’t be seen). If you’re interested to see how I did it, and what I used, here you go!

IMG_6322.JPG

What You’ll Need:

Cement bowl or vessel (I used a cement pot as well as a leftover cement candleholder)

Straw filler, bubble wrap or newspaper (something that can fill the bottom of the vessel)

Dry preserved moss

IMG_6323.JPG

Directions:


1. Lay your filler at the bottom of your vessel, and fluff it up until it almost reaches the top. In my case, I used packing straw that I had from a PR package. It worked great!

IMG_6321.JPG

2. Take your preserved moss out of the package, and start breaking it up into pieces to lay over your filler. I mismatched different colours of moss to add more interest, but you can stick to one colour if you like! Some of the Restoration Hardware arrangements feature “patches” and “spheres” of moss, so I took a few pieces to mold them into “moss balls” as well.

IMG_6318.JPG
IMG_6320.JPG

Once you have your desired look, rinse and repeat for as many vessels as you like! Let me know how your centrepiece turns out - I’d love to see it!

xo

Linnea

DIY Floral Backdrop

Linnea A.

IMG_5469.JPG

I promised you I’d walk you through how I made the floral backdrop for my Mom’s dessert table, so here it is! I scoured the internet for inspo photos, and once I saw hanging flowers, I knew that was it! But because I rented my party room that didn’t have white/blank walls, I had to be pretty creative as to how I would hang my garland (I’d highly recommend finding a blank white wall to make it easier lol). Curious how I did it? Spilling all the tea below!

IMG_5468.JPG
IMG_5467.JPG

What you need:

  • White opaque shower curtain (Dollar store, obvs)

  • 2 sheer curtain panels (or 1 large one)

  • 3 command strip hooks

  • Double-sided tape

  • Faux ivy garland

  • Fishing line

  • Scissors

  • Fresh flowers

  • Twinkle lights

IMG_5466.JPG
IMG_5472.JPG

How to do it:

  1. Start by measuring out how wide you’d like your backdrop to be. It should ideally be as wide as your shower curtain, which will act as a blank canvas for your backdrop. Once you’ve measured it out, stick the command hooks on the two outside corners. Next, stick 1-2 in the middle, depending on how heavy you anticipate your garland will be. I only used 3 hooks for mine.

  2. Hang your shower curtain on the appropriate hooks, then layer your sheer curtains over top. To do this, I poked holes through the top of the panels, hooked them onto the command hooks, and used a little bit of double-sided tape wherever the curtains needed extra hold. Once you have your desired backdrop, it’s time to get creative!

  3. Hang your faux ivy garland on the hooks. Measure out long strings of fishing line, and tie them sporadically along the top of the garland, wherever you’d like your flowers to hang.

  4. Snip your favourite flowers about an inch away from the bud, and start tying the flowers onto the fishing line, using the bud leaves to catch the fishing line. I started with alternating pink and white carnations, and added roses on every other strand as I went.

  5. Lastly, string your twinkle lights up and over your hooks and along the backdrop. Et voila, your magical floral backdrop is complete!

Be sure to tag me in your posts if you try this DIY out! I’d love to see your creations :)

xo

Linnea

How to Create a Dessert Table

Linnea A.

IMG_5177.JPG

Over the past few weeks, I’ve been secretly planning my mama’s surprise 60th, which went off without a hitch, and she was absolutely floored! She loved it all, and had absolutely no idea. But the showstopper of the entire event definitely had to be the dessert table, which was my goal. HUGE thanks to my aunt for helping me set it up, and contributing so many delicious sweets along with my Grandma! Wondering how I created this bad boy?! Keep on reading, and I’ll share all my tips & deets!

SPATS-Recap2.jpg

1. Pick a colour scheme. What’s the celebrant’s favourite colour? Do they have any favourite flowers or greens? This will help determine the colours you’ll be using throughout your entire event. Pick this first, then you can figure out the balloons and other decor to correspond and compliment the floral/dessert colour way later.

FullSizeRender.jpg

2. Gather your inspo. After you’ve skimmed through Pinterest and Instagram, what’s the reoccurring theme in your inspo photos? Are there similar treats or flowers in every photo? Put all your photos into a collage, so you’ve created yourself a moodboard that you can easily share with the baker, florist, and all the decorators lending a helping hand! It’s key to ensure everyone’s on the same page with your vision.

IMG_5172.JPG
IMG_5231.JPG

3. Shop your home. As someone who loves decor and entertaining (and the daughter of someone who loves it just as much), I had LOTS of inventory to work with, so I had to be resourceful. We have cake stands and platters up the ying yang, so it was just a matter of me gathering my favourites together (without her noticing anything was missing from her house), shopping my own home for all my marble slabs, cutting boards, lanterns and vases, and putting them all together. I also used jewelry boxes and dishes for the table, and I had some wooden stumps lying around (originally sourced for an event that never happened *cough* LOL), so I kindly asked my Dad if he could cut them into wood rounds for the dessert table. And he KILLED IT. I scattered the wooden rounds throughout the room, and they elevated the look of the whole event!

IMG_5226.JPG

4. Choose a focal point. What’s gonna make your table stand out? Will you have a balloon garland along the top, a hanging sign in the middle, or a full backdrop? I decided to create a full DIY floral backdrop. This took a lot of thought as to how I would hang everything because I couldn’t put any holes in the wall, but it all worked out perfectly. I’ll definitely break down how I made my floral backdrop in another post!

IMG_5236.JPG
IMG_5171.JPG
IMG_5251.JPG

5. Sketch out your table. This way, you’ll figure out what you’re missing, and what you still need to do. I had a running list week after week of what I needed to accomplish before the big day. The sketch also helped tremendously when I was setting everything up. It’s easy to forget the vision in your head when you’re overwhelmed with to do’s, but if you draw it out beforehand, you’ll be able to show the others helping you what you’re going for, and it makes your life a whole lot easier!

IMG_5174.JPG
IMG_5230.JPG

6. Pick your desserts. Based on your inspo photos and your sketches, you’ll get a good idea of how much dessert you need to fill the table, and what to ask for if people offer to bring/bake something. I knew a big cake was a must, but what about everything else? My Grandma is an incredible baker, so she made 3 types of cookies, and 2 different cakes. I also made Lavender cupcakes, we had hand-painted macarons, intricately designed cake pops, and bite-sized Food for the Gods. Let’s just say we had NO SHORTAGE of dessert.

IMG_5178.JPG

7. Eucalypus and twinkle lights. Period. My best tip for any party is to buy a whole bunch of silver dollar and seeded eucalyptus, and scatter it throughout the room. I put it all along the food table, mantle, dessert table, and made all the floral arrangements with tons of eucalyptus. In addition, I gathered all the twinkle lights I own, and scattered them all throughout the dessert table, inside of glass lanterns, and wove them along the cake stands. It adds such a magical touch!

IMG_5238.JPG
IMG_5232.JPG

8. Make your own floral arrangements. Nobody knows your colour scheme like you do, or your vision, for that matter. Floral arrangements are actually a lot easier than you think, so my advice is to buy a whole bunch of greens and flowers in your colour scheme, then break them apart and make your own arrangements to suit the vases you have on hand. Not only is this cheaper, but it looks so much better, and you’ll also feel better, knowing you made them all!

Hopefully this helps you out the next time you have to plan a party and want to create a show-stopping dessert table! If you have any questions about where I got certain things, or want more tips, feel free to email me, DM me on IG, or leave a comment below! Always happy to share. <3

xo

Linnea

5 Fresh Holiday Decor DIYs

Linnea A.

IMG_4137.JPG
  1. DIY “Fresh” Ornaments

What you need:

  • Set of clear ornaments, medium sized
  • Fresh greens (eucalyptus, evergreen, pine) 
IMG_4663.JPG

Remove the caps of your clear ornaments, and fill them with your favourite greenery. I filled mine with pine, evergreen and eucaluptus, then mixed them up with other ornaments and pinecones, some twinkle lights, and a dome, and I was set!

IMG_4652.JPG
IMG_4136.JPG

2. DIY Pine “Tree”

What you need:

  • Vintage pot
  • Wet flower foam
  • Fresh pine
  • Scissors
  • Mini ornaments  
IMG_4520.JPG

Fill your favourite pot with wet flower foam (soaked so the pine stays fresh), snip some pine twigs, and arrange them in the foam as you see fit. Scatter the arrangement with some mini ornaments, and voila, another piece of lively decor!

IMG_4508.JPG

3. DIY Cotton Stem Arrangement

What you need:

  • 2 cotton flower stems (Michael’s has them)
  • Seeded and silver dollar eucalyptus
  • Fresh pine
  • Vase
  • Floral wire

Arrange the eucalyptus bunches with your cotton stems, and secure with floral wire. Fill your vase with water, place your eucalyptus bunch in the vase, and scatter fresh pine around the arrangement until the vase is full. So simple!

IMG_4146.JPG

4. DIY Candleholders

 What you need:

  • Clear glass bottles
  • Fresh pine, evergreen, and eucalyptus
  • Water
  • Tapered candlesticks

Snip 4 stems of your choice, big enough to fill the body of the bottle. Place one stem into each bottle, and carefully fill each bottle with water. Secure your candlesticks into the tops of the bottles, and you have yourself the easiest Christmas centrepiece!

IMG_4651.JPG

5. DIY Twig Wreath

 What you need:

  • Twig wreath (I got mine from Michael’s)
  • Fresh eucalyptus
  • Assorted sprigs (also from Michael’s)
  • Burlap ribbon
  • Floral wire
  • Scissors
IMG_4664.JPG

 Place your eucaluptus and sprigs where you want them. Snip some floral wire and wrap the sprigs and eucalyptus in place. If you’d like ribbon on your wreath, feel free to wrap some of that around the wreath too!

When you’ve got your desired look, hang your wreath with your burlap ribbon, and tie a bow to secure it. I always like to hang the wreath with a command hook behind it as well, just to help support the weight of the wreath, and to prevent it from falling down. 

Looking for more decor DIYs?! Not to worry - I’ve got a whole bunch coming your way!

xo

Linnea

DIY Succulent Pumpkin

Linnea A.

IMG_1654.JPG

It’s officially Thanksgiving here in Canada, and what better way to celebrate than with a centrepiece DIY! I absolutely love fall and all that comes with it (including pumpkin spice and everything nice).  For this year’s Thanksgiving centrepiece, I decided to put two of my favourite things together and make a succulent pumpkin! Follow along for the process and end result :)

IMG_1651.JPG

what you’ll need

  • Pumpkin or gourd of your choice

  • Various succulents

  • Knife

  • Big spoon or scoop

  • Marker or pen

IMG_1642.JPG
IMG_1652.JPG

let’s get to it​

IMG_1647.JPG

1. Before you do anything, arrange your succulents the way you want them in your pumpkin. Based on the size of your succulents, draw the circle you’re going to cut into your pumpkin. 

​2. Carve the circle and pull the top off your pumpkin. Scoop out all the guts until your pumpkin is completely clean, then give it a good rinse.​

IMG_1646.JPG

3. Now for the fun part! Take your biggest succulent out of its pot, and place it into the pumpkin in your desired spot. Repeat the process with all of your succulents until you achieve your desired arrangement. Wipe down the sides of your pumpkin, and voila! All set for turkey dinner.

IMG_1653.JPG
IMG_1649.JPG
IMG_1643.JPG

I can’t express how thankful I am for everything and everyone in my life - I’m blessed beyond and I’m grateful for that everyday! Special thanks to you guys for reading and continuing to inspire me :)

Happy Thanksgiving loves!

Xo

Linnea

Floating Shelf Inspo

Linnea A.

I've been planning on putting up floating shelves in my kitchen for a while now, and I think the time has finally come to get cracking and do the damn thing! I plan to store some extra plates, mugs and knick knacks on the shelves, so they have to be durable and strong enough to hold everything - without ripping the wall out. I thought about hiring someone to make the shelves, and put them up (because my walls have concrete behind them), but I think I've decided to just do it myself. A little DIY can't hurt nobody... or can it...

Either way, I'm sharing a round up of my favourite kitchen shelves I've come across thus far, in hopes to create a similar look with mine - coming soon! Of course, I'll take you through the whole DIY process once I get there.

IMG_4365.PNG

If you have any great DIY shelf tutorials, I'd love to hear about them! 

xo

Linnea